My Basic Tutorial
The software can be "scary" at first but once you mess around a little and really play with it, it makes total sense and is easy.
*****First and foremost, check www.atinorthamerica.com and make sure you have the most current version. Please, please, please read the entire tutorial before starting.******
1) Plug lamp into control box
2) Plug control box to power
3) Plug control box to computer
4) In the upper right hand of the screen there are 2 circles. One is labeled "USB" and the other is labeled "LAMP". They should both be BLUE. If they are NOT both BLUE: exit the software and try steps 1-3 again.
*******THIS NEXT PART IS VERY IMPORTANT*********
5) Click "File" in the upper left hand corner and click new. A box will appear with 4 different selections. Choose the one that corresponds to the lamp you have. If you have 1 LED cluster select "LED 1/T5". If you have 2 LED clusters select "LED 2/T5" and so forth.
6) A graph will appear on the screen. There are 3 boxes in the lower left corner of the program. Two are labeled (Mode and Day Preview) and one is not. The one that IS NOT labeled will be known as Command Center (I made this up. It isn't a technical term used by ATI or anything.)
7) Click "Play" in the Day Preview box. A line will start scrolling across the GRAPH. As that line gets to each "circle" (this is known as a SETPOINT) it will command the lamp to perform something i.e. turn the LEDs on or change color etc. etc...
8) Once the Day Preview has finished, you should have a better understanding of what we are going to do from there.
Here is a picture of my current graph....(don't worry about the CUSTOM colors on the bottom of the screen. We will set those up later. The defaults are just fine for now.)
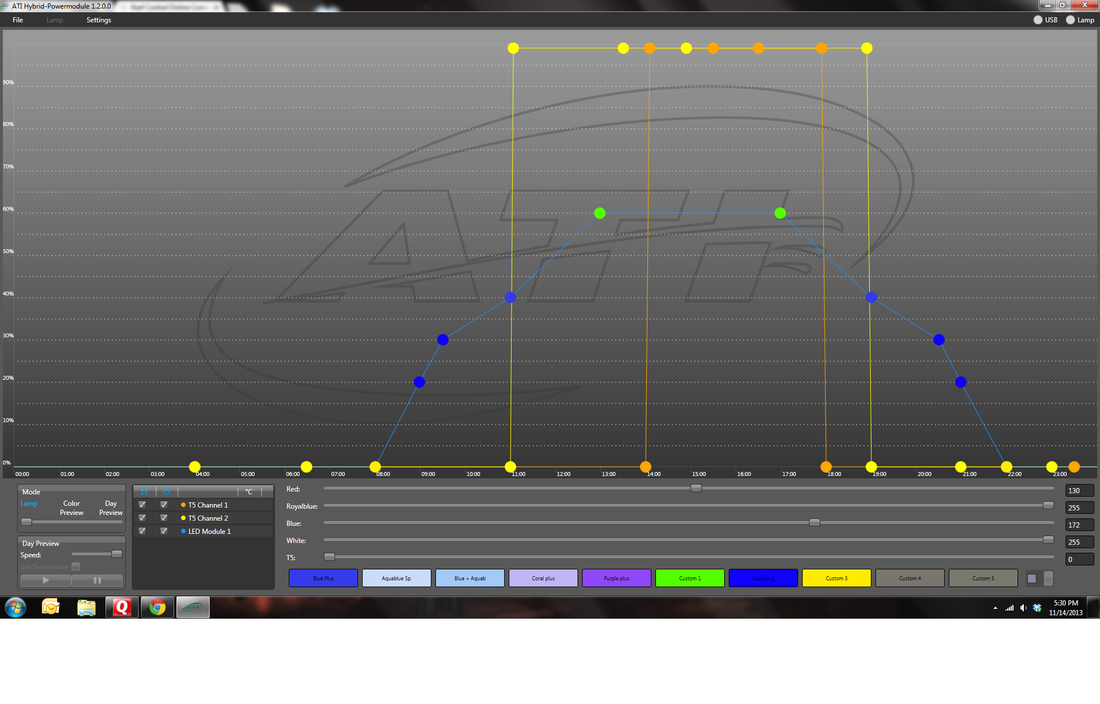
(You will notice there are a lot more dots on my graph than normal. This is a quick and easy fix. Go to the top and click "Settings". A box will appear and find SpacingTime and SpacingIntensity. Change both to 5 and select OK. Yours should now look the same as mine. This is optional though depending on what you like.
Each dot on the graph corresponds to a "time" and "intensity". That is what those dots are. You can drag setpoints to a dot and that will order the lamp to perform a function.)
For right now I will recommend that most new users leave the default program on and just adjust your intensities above. This should get most started and on their way.
After you have adjusted the graph to your liking, check it out in the Day Preview box by clicking PLAY and watching what your light does.
Once you are happy, select LAMP in the upper LEFT hand corner. Click "save in lamp" and wait. A box will pop up showing that it is saving. It will start counting UP to 100%. Once that is done, you can exit the software and disconnect your control box from the computer.
You will need to make sure your control box is set to the correct time. This is really easy.
Press the center button on the control box and select clock. Set the correct time. It uses a 24 hour time format AKA military time. Pretty easy to change. Once you have the time, press the center button and select YES. (YES and NO correspond to the buttons on the control box.)
You are done. Get a drink of water and stretch to properly cool down.
PS - Do NOT try to make changes from the control box alone. I know that ATI says you can but I HIGHLY recommend against it. You can mess things up pretty easily and you will spend HOURS trying to scroll from 0-255. It isn't worth it at all.
Ryan
